
The internet as we know it today runs on a complex web of protocols and servers. One such integral part of this web is the Domain Name System (DNS), which acts as the internet’s phone book. It translates human-friendly website names, like ‘www.google.com‘, into numerical Internet Protocol (IP) addresses that computers use to communicate with each other.
However, sometimes, when trying to access a website, you may encounter a vexing error message on your screen – “DNS Lookup Failed.” This message indicates that your browser, in this case Google Chrome, was unable to find the IP address corresponding to the website’s URL through DNS.
This article takes a deep dive into this DNS Lookup Failed error, particularly in Google Chrome, its causes, how to resolve it, and prevent it from recurring.
When it comes to browsing, Google Chrome browser is the favorite browser of majority of users. But these days a problem of DNS lookup failure troubles the users of Google Chrome Browser most. This failure is more prominent if you are using a broadband connection. Now why this error occurs? What are the main reasons? How to Fix DNS Lookup Failed Error in Windows? We will look at every particular aspect. This error often occurs when internet connection is not properly working or may occur when DNS server does not responds. Reason for DNS lookup failure is probably and majorly seen in Windows XP, 7, 8 and 10. But this problem is something for which you really not to be worried about, as here today I will guide with easy methods to fix this DNS Lookup Failed on Chrome.
DNS is the short form (Domain name server) that translates a site name into computer ipaddress. DNS lookup failed can be a happening problem in Google Chrome more especially if we’re having a broadband connection. This Error is very common and typically occurs when your net connection isn’t effectively working properly.
DNS Lookup Failed Error in Google Chrome
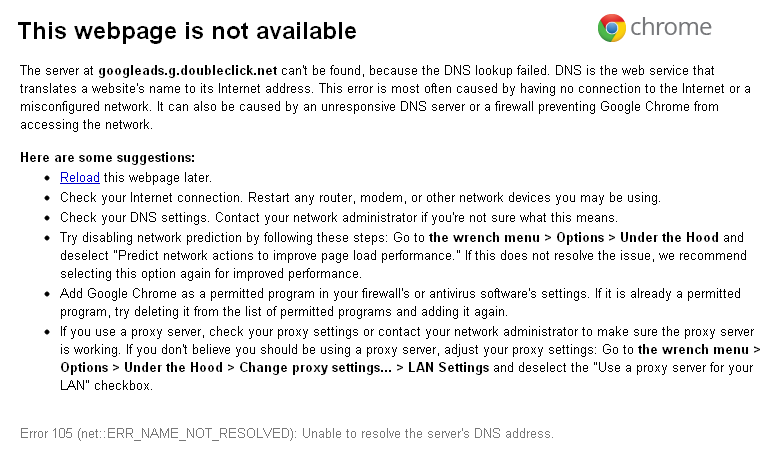
When this error occurs in Google Chrome, the message is typically displayed as “This webpage is not available. DNS_PROBE_FINISHED_NXDOMAIN.” While this message may seem cryptic, it essentially means that Google Chrome tried to locate the website’s server using DNS and failed.
Several factors could lead to this issue, including problems with your internet connection, a corrupted DNS cache, faulty network settings, an outdated network adapter driver, or problems with the DNS server itself.
What exactly is DNS Lookup and the message that pops up?
Before looking to what can be the probable reasons, let me first tell you what actually a DNS is? Basically, DNS is the network service that translates a name of website to its Internet address. Now this error can be caused due to many concerns. This error is often caused due to network misconfiguration. Or may be due to unresponsive DNS server that prevents Google Chrome to access the open network. When the DNS lookup failure occurs, the message that pops up reads like-
The server at www.example.com can’t be found, because the DNS Lookup failed.
Sometimes similar error like DNS_PROBE_FINISHED_NXDOMAIN error and DNS_PROBE_FINISHED_NO_INTERNET may also appear in the Google Chrome browser that means same as the DNS lookup failure.
DNS lookup failed mainly occurs when the DNS server isn’t any longer performing or your web isn’t working properly. This problem resembles DNS_PROBE_FINISHED_NXDOMAIN problem and DNS_PROBE_FINISHED_NO_INTERNET problem in Google-Chrome browser. So, follow the under easy steps to only solve this error.
DNS lookup failure is a typical problem in Google-Chrome browser should you be employing a broadband connection. This error often occurs once your web connection isn’t effectively working or it may occur once the DNS server is no longer responding.
Look for our another article which deals with How to fix dns_probe_finished_no_internet Error?
At times such message becomes the most irritating. This is one such error which is faced by majority of the users. Though there is simple solution to fix this issue. But the point is many of us are still not aware about such methods that may help them to easily solve the DNS lookup failure while using Google Browser. Well, you can also switch to other browsers as well. If you simply want to avoid this message. And this thing could be called as the best Fix DNS Lookup Failed error. But since we know Google Chrome stands out from all other browsers and is best available for Windows right now. I don’t think you will be doing that.
So let’s just stick to use of famous Google Chrome browser and look at the methods that are hell easy to solve the problem of DNS lookup failure error instead of just uninstalling the Chrome. Let’s begin with the guide to Fix DNS Lookup Failed Error.
How to Fix DNS Lookup Failed easily
Method 1- Change default DNA servers
Well this is one of the most common way to get rid of DNS Lookup Failed Error.
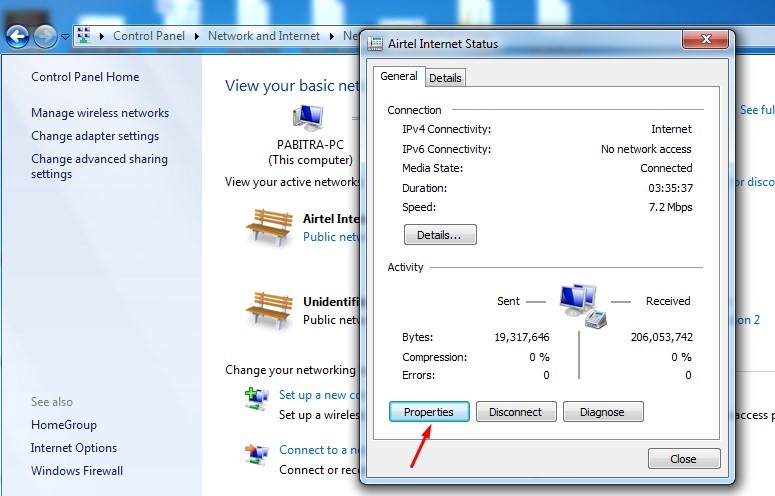
Steps 1- From start button go to Network and Sharing center on your Windows PC. You can access the same from right click on Network icon or go to Control panel >> Network and Internet >> Network and Sharing Center.
Step 2- When you reach their click on the currently connected Network Adapter.

Step 3- A pop up window will appear. In following window click on Properties.
Step 4- After when you click on Properties, press the Networking tab and click on the latest version of Internet Protocol shown in your window. Again select its properties.
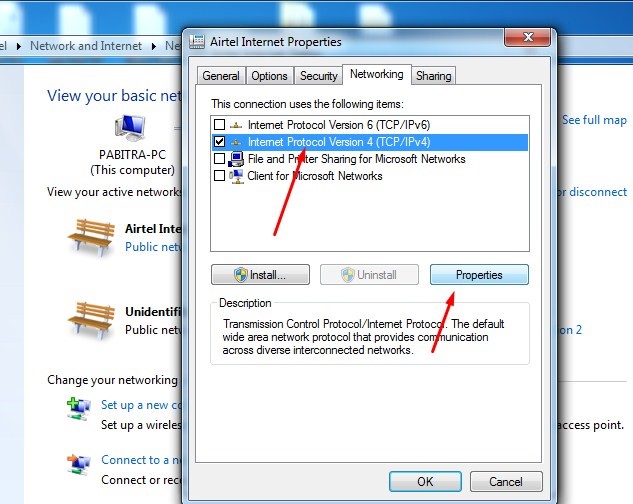
Step 5- Now select “Use the following DNS server addresses” from the Window screen that appears. Enter the following DNSs as
Preferred DNS Server: 8.8.8.8
Alternate DNS Server: 8.8.4.4
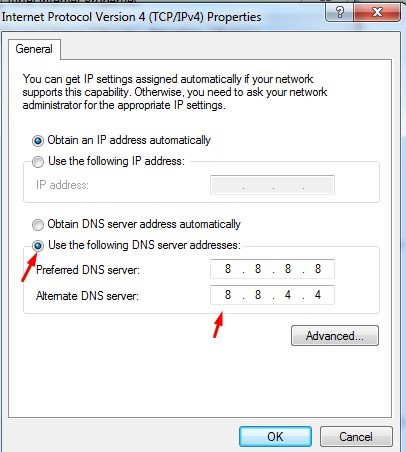
Step 6- Finally Click on OK and continue to reboot your system. Connect your Windows to the internet connection.
Method 2- Contacting Network Administration
Now if you actually don’t want to alter or play with your DNS settings, you can do this job to Fix DNS Lookup Failed Error. Let us see, what is it?
Step 1– Firstly you need to change your DNS settings. This can be done by disabling the network prediction. To perform this-
Go to Google Chrome Menu > Settings > Advanced Settings > and then deselect “Predict network actions to improve page load performance.
If this does not solve the issue it is recommended to try for it once again.
Step 2– Now allow the Chrome to access your network in the firewall settings or antivirus settings.
Step 3– If it is already listed try to remove it and add your network again.
After when the error will get successfully resolved the message will appear “Successfully flushed the DNA Resolver Cache.”
Method 3 – Fix DNA Lookup Error using Command Prompt
The above two methods works just fine to Remove DNS Lookup Failed in Chrome. But here is one more way which includes Command Prompt and you can work it up with this.
Step 1– Firstly open Command Prompt Window (Admin).
Step 2- Now run one by one the following mentioned commands-
ipconfig /release
ipconfig /all
ipconfig /flushdns
ipconfig /renew
netsh int ip set dns
netsh winsock reset
Step 3- After when you have successfully run the commands, Restart your PC. Connect your computer to viable Internet connection.
Your problem is been resolved.
Method 4- Fix DNS Lookup Error by clearing Cache and Cookies
In case the above methods related to network administration does not works, you can try for this last method to solve the problem of DNS lookup failure error.
Step 1- Open your Google Chrome Browser.
Step 2– Click on the Toolbar and then go to Chrome Menu icon.
Step 3– From the Menu list, click on settings.
Step 4- Scroll down a little and you will find Show Advanced Settings. Click on it and more settings of Google chrome will get displayed.
Step 5– From the settings, click on Clear Browsing data option.
Step 6– A pop-up window will appear and from that click on Browsing history, Download History, Cookies, Other site plug in data and Cached Images and Files.
Step 7– Then from options select The Beginning of Time and Click on Clear Browsing data.
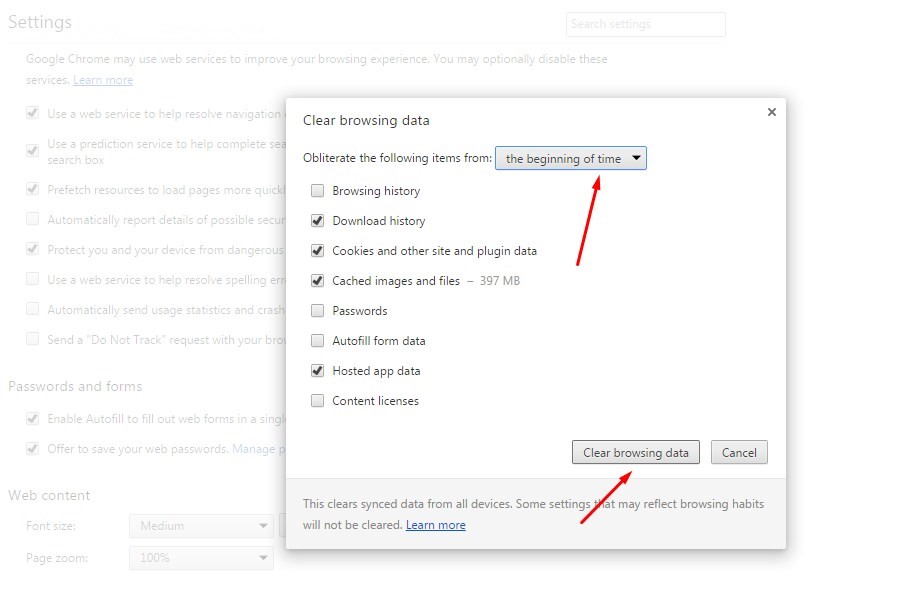
Once the following process will get finished you can begin to restart your computer and your internet connection will again be connected.
Well, to avoid this DNS server failed error you must also try to keep your system maintained regularly by keeping it free from viruses and malwares. Usually when there is a persistent presence of such malicious content or viruses, non registry files, or corrupted data this problem of DNS lookup server may occur. So it is recommended to fix your PC timely to avoid landing into such messages. Further, if DNS server failure occurs you can also ping DNS server from some other devices to check the connection once.
Google Chrome no doubt is the most favorite and useful browser of all as it is known for its speed, and security. Hence DNS Lookup Failure Error occurs constantly while using it. But with these easy to follow steps that are mentioned above, one can easily get rid out of this problem. This problem can occur anytime whenever the internet connection gets lost. So it’s better to have a solution to get rid of this problem. Go on for trying these steps to fix the problem, it actually works.